NetX™ CloudConnect™ Communications IP Step-by-Step Installation Guide
ATTENTION: DO NOT INSTALL the thermostat until you have all the necessary network information.
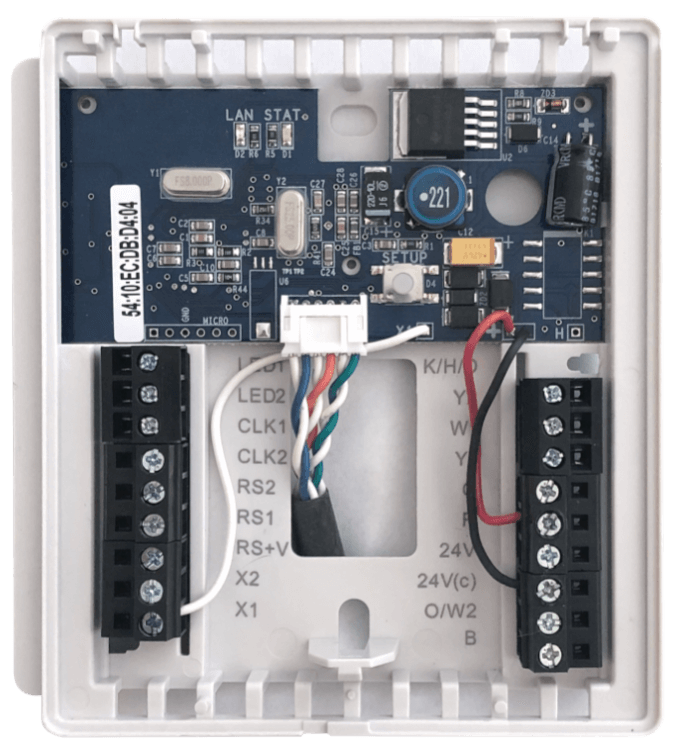
STEP 1: INSTALL THE THERMOSTAT BACKPLATE
Turn off the power to the HVAC unit and follow the detailed instructions included found here. Make sure the wires are connected to the correct terminals. In addition to the thermostat wires, there are three (3) wires from the Backplate. Connect the RED wire to the R terminal (along with the Red wire in the thermostat cable), the BLACK wire to the 24(c) terminal (along with the common wire in the thermostat cable), and the WHITE wire to the X1 terminal. These wires are shipped connected the proper locations and are noted here for completeness.
STEP 2: Connect Network Cable to BACKPLATE
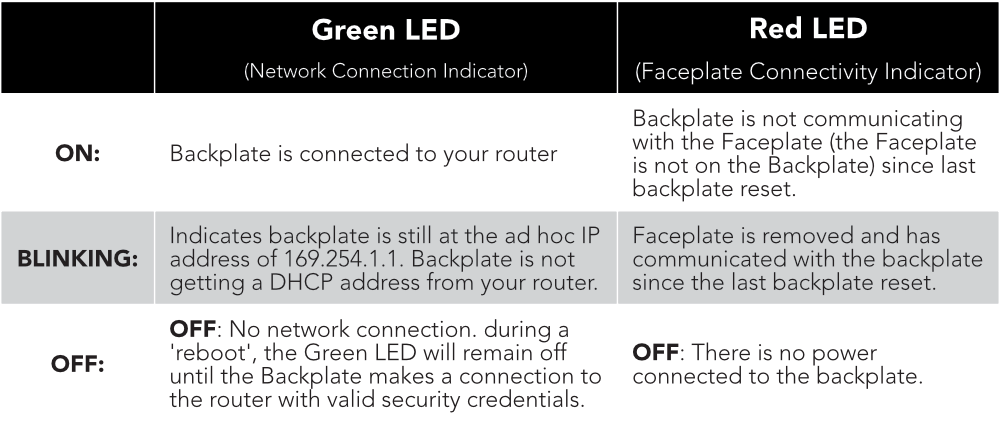
Once the thermostat is connected to your network, the backplate LEDs will indicate the following status:
Green LED (Network Connection Indicator):
ON: This shows the Backplate is connected to your router
Red LED (Faceplate Connectivity Indicator):
Blinking: The faceplate has been removed and communicated with the backplate since the last backplate reset.
NOTE: If both LEDs are not on, refer to the troubleshooting section of this instruction sheet.
Step 3: Install The Thermostat Onto The Backplate
Follow the instruction guide to install the thermostat onto the Backplate. When connected to the network, the faceplate Ethernet icon will display.
Step 4: FIND YOUR NetX THERMOSTAT USING THE NetX™ DEVICE EXPLORER Tool
The NetX™ Device Explorer tool can be downloaded here. The Device Explorer will run on any Windows PC or Mac computer allowing you to see and connect to any of your NetX Devices on your local network, using only your browser.
https://www.networkthermostat.com/software/netx-explorer-mac-and-pc
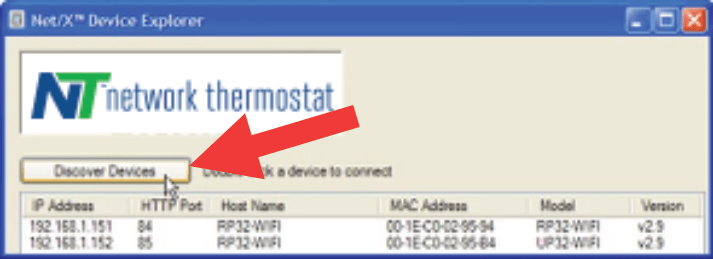
Start the NetX™ Device Explorer. Click on the 'Discover Devices' button. Double-click on one of the thermostat entries to go to its Credentials page.
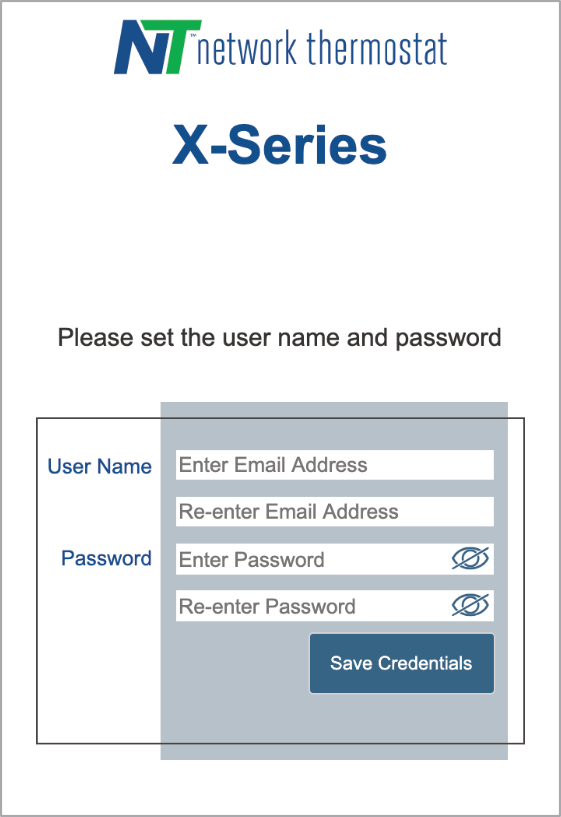
Step 5: Configure Credentials
Your browser will open to the thermostat’s Credentials page. Enter your username and password for the thermostat. Click on the “Save Credentials” button to save your information. You will be taken to the login page for the thermostat. For CloudConnect™ configuration go to the URL in the next step.
Step 6: Connect To Your Thermostat Using NetX™ CloudConnect™ Service
Using a desktop browser, go to the URL https://netx-cloud.com. Log in with the same username and password you used in Step 5.
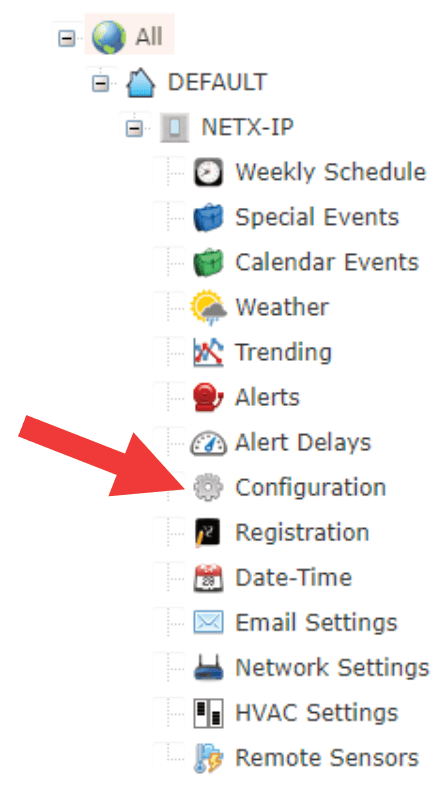
Once logged in, you will see a dashboard with your thermostats on the right and a drop-down menu on the left. Expand the menu under “New Site” and “Default.” Expand the thermostat (click the ‘+’ to the left of the thermostat name) and navigate to the Configuration page. Proceed to Step 7 for Configuration.
NOTE: Thermostats are automatically enrolled with free CloudConnect™ for 30 days.
Step 7: Edit your Thermostat Configuration
1. Enter a unique descriptive name in the Thermostat Name box.
NOTE: Thermostat names may have a maximum length of 15 characters with no spaces.
2. Click the Apply button for the thermostat name to be saved.
3. Enter the Site Name.
4. Enter your address with your Zip Code. (Adding the Zip Code is Required for the thermostat to access your current weather and forecast information)
5. Click the Apply button.
6. Make any additional adjustments as needed.
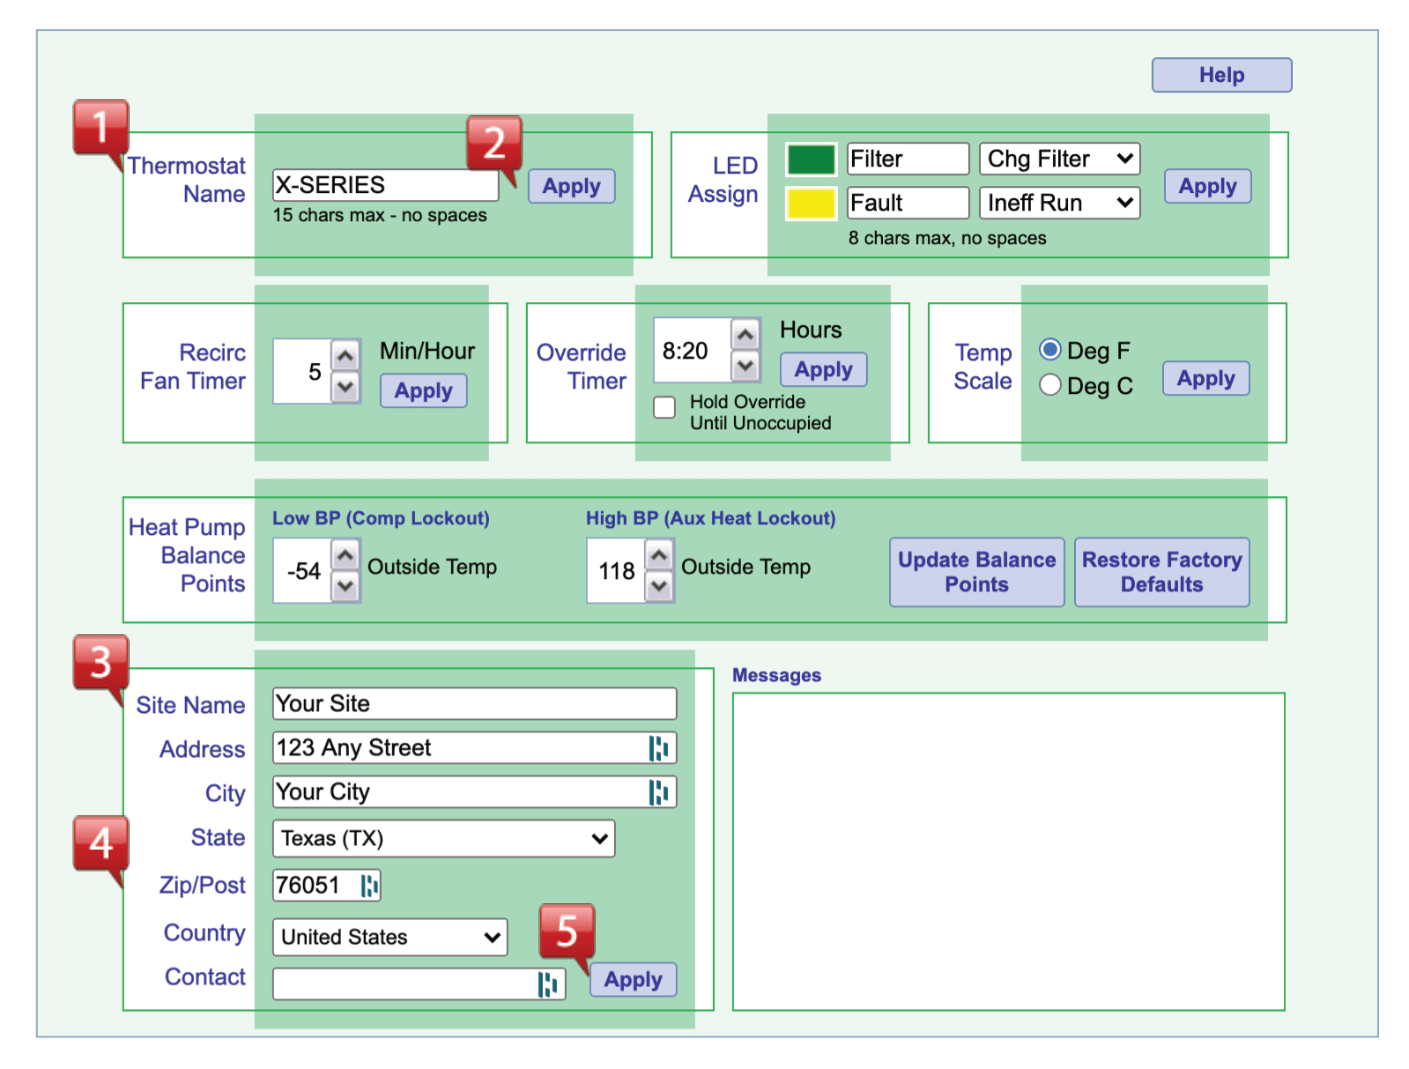
ATTENTION: Make sure to click the appropriate Apply button located in the same block as the parameters you have adjusted. The thermostat will not update its parameters unless the appropriate Apply button is clicked.
DirectConnect Installations
(Non-Cloud Applications)
If you decide you don’t want or need the CloudConnect™ service, refer to the DirectConnect™ instructions and move your thermostat to a static IP address, and port forward your router, as described in the DirectConnect™ documentation. Go to the link below for additional instructions and documentation.
https://networkthermostat.com/x-series-installation
Troubleshooting
Here is a chart showing the Green and Red LED status.
Recovery Modes
There are two options for recovery mode: Soft Reset and Factory Reset. Soft Reset only changes your network settings while all other settings are retained. Factory reset removes all your changes and returns your IP Backplate to its original factory configuration. See below how to use each reset.
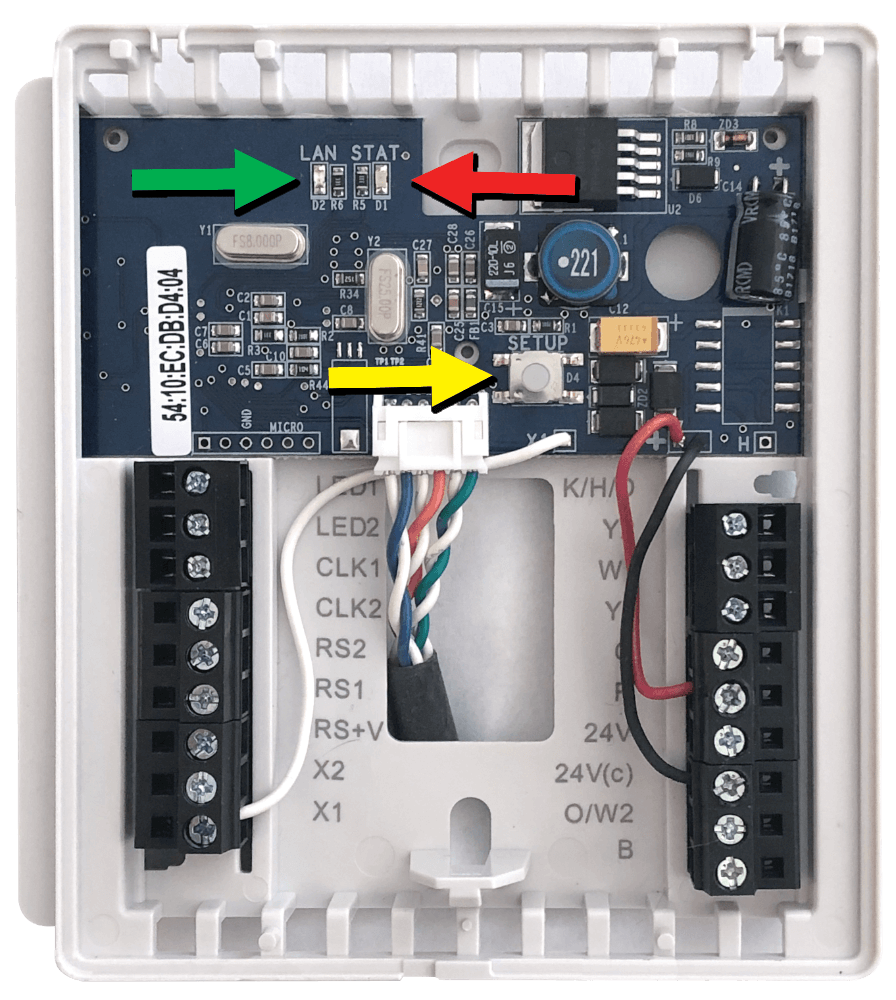
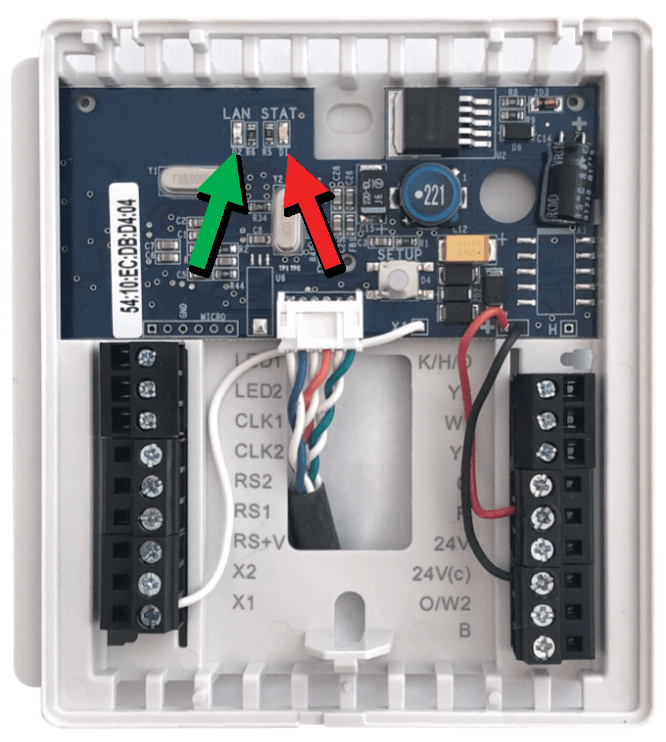
Soft Reset
Press and hold the SETUP button (yellow arrow) for 10 seconds. When both the Green LAN LED (green arrow) and Red STAT LED (red arrow) flash together, release the SETUP button, and the IP Backplate will remove the network settings and reboot. Follow the instructions in STEP 3 through STEP 4 above to configure your IP Backplate.
NOTE: This reset maintains your current username and password.
Factory Reset
Press and hold the SETUP button (yellow arrow) until both the Green LAN LED (green arrow) and Red STAT LED (red arrow) flash together. Next release the SETUP button. While the LEDs are flashing simultaneously, press the SETUP button with three short presses, and the IP Backplate will remove ALL programming and reboot. Follow the instructions in STEP 3 through STEP 5 above to configure your IP Backplate.