Setup your Net/X™ Thermostat for Connection to Your Local Area Network (LAN)
To set up connection to your thermostat from the local Wi-Fi network,
follow the instructions below.
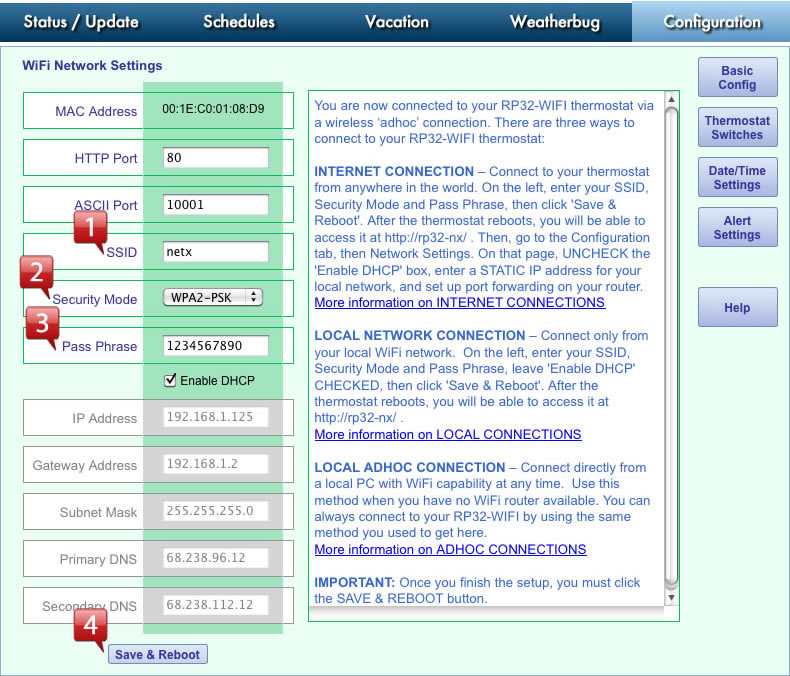
STEP 1: CONNECT TO YOUR WIRELESS NETWORK
On the left side of the screen, perform the following
![]() Wireless network's SSID,
Wireless network's SSID,
![]() Wireless network's Security Mode,
Wireless network's Security Mode,
![]() Wireless network's Pass Phrase, and leave 'Enable DHCP' checked.
Wireless network's Pass Phrase, and leave 'Enable DHCP' checked.
![]() Then click 'Save & Reboot'.
Then click 'Save & Reboot'.
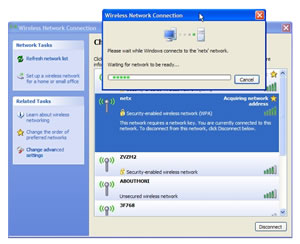
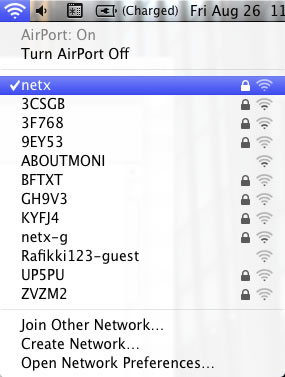
STEP 2: RECONNECT YOUR COMPUTER TO YOUR WIRELESS NETWORK
While the thermostat is rebooting (it only take a few seconds), go back to your
computer's Network Settings, locate your wireless
connection, and reconnect to
your regular wireless network. (This will be the SSID and password you just entered).
The screen shots below show typical PC and Mac wireless network dialogs
Once you have reconnected to your wireless network, start the Net/X Device Explorer™.
If you haven't installed this utility,
download it from the website at: www.networkthermostat.com/software/NetX_Device_Explorer.msi. Install and launch it.
The Device Explorer will run on any Windows PC and allow you to see and connect to
any of your NetX Devices on your local network,
using only your browser.
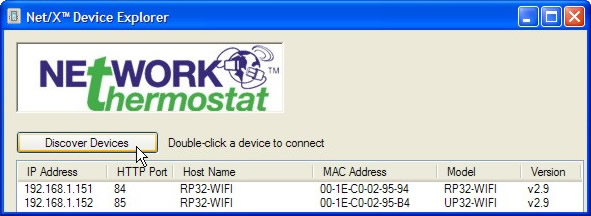
After launching Device Explorer, click on the 'Discover Devices' button, and when the
replies appear,
double-click on the thermostat to
go to the thermostat's main page. If you are only going to connect to youra
thermostat(s) via your local network, the Net/X Device Explorer is the easiest method to access your thermostats.
STEP 3: OPTIONAL - SETTING UP THE THERMOSTAT FOR USE WITH A STATIC IP ADDRESS ON YOUR LAN
Click on the Configuration tab, and then click the
Network Settings button
![]() On the Network Settings page, UNCHECK the 'Enable DHCP' box
On the Network Settings page, UNCHECK the 'Enable DHCP' box
![]() Enter a STATIC IP address for your local network. If you don't know what IP address
you can use, you'll need to log into
Enter a STATIC IP address for your local network. If you don't know what IP address
you can use, you'll need to log into
your router and see where the DHCP range is set.
Select an available IP address that is OUTSIDE of the DHCP range. It can not be
one
that
being used by
any other device/computer on the local area network.
(Do not change any of the other settings; Gateway, Subnet, Primary & Secondary DNS.
These items have been automatically pre-filled
to work with your network settings.)
![]() Then click 'Save & Reboot'.
Then click 'Save & Reboot'.
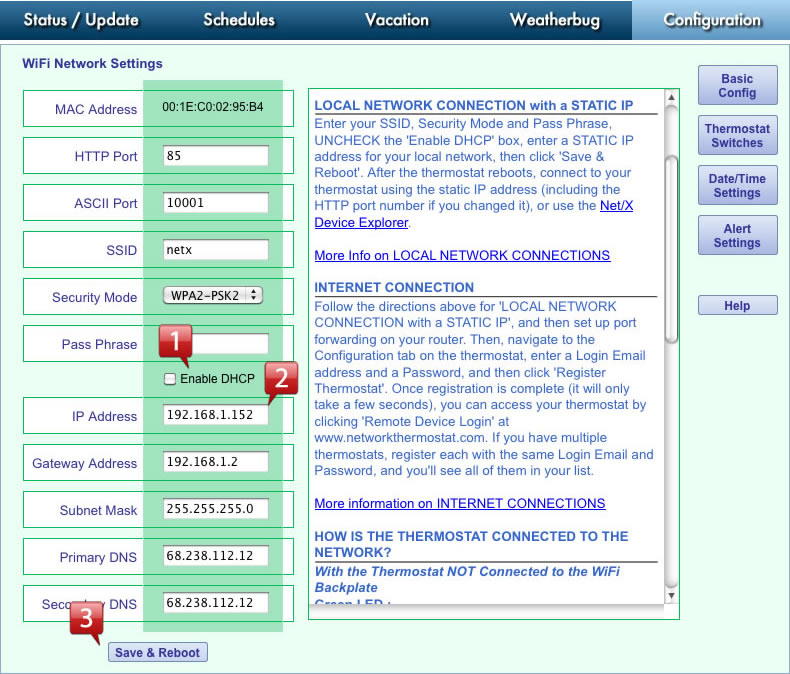
NOTE: When configured using a static IP address on your local network, you can either use the Net/X Device Explorer to
connect to your thermostat(s),
or you can
enter the static IP address and port number in your browser. In the example above,
you would enter 192.168.1.152:85
in your
browser address bar.